Loading Sounds Into The Yamaha DX7 Series Via Midi
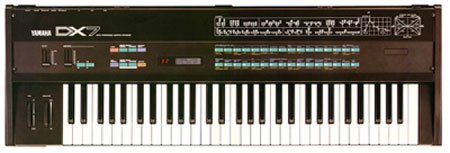
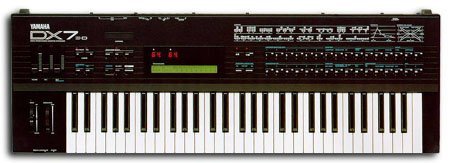
Midi Tips May 21st, 2010The Yamaha DX7 was one of the best selling synthesizers in the history of electronic music. It’s been over twenty years since the last ones finally rolled off Yamaha’s assembly line, but there are still a lot of them in use all over the world and lots of musicians still looking for new sounds. The sound collection that we programmed for the DX back in the 80’s has been one of our best selling patch sets with over 1000 new sounds in all. The sounds are no longer available on ROM or RAM cards. They come in a system exclusive (also known as sysex) or a standard midi file format (.mid) – so you need to load the sounds using your computer and a midi interface.
Here are some tips on how that is done……
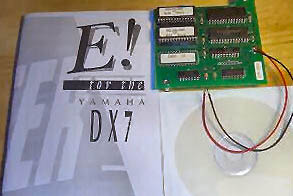
The first thing to remember is that there were several different models of DX7’s. The original “brown” DX was one of the first instruments to have MIDI. It had limited midi features and several bugs which were improved on the later DX7-2 models. The DX7-2 Series included the DX7-2, DX7s and the DX7-2FD. The 2FD had a built in floppy disk drive and we actually offer our DX7 sounds in that format as well. In addition the company “Grey Matter” produced the “E” update. When the E board was installed in the DX it expanded the memory. Loading new sounds into each version via midi is a bit different on each model – so we have listed the set up procedure for each model DX.
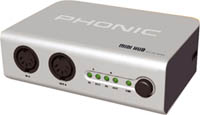
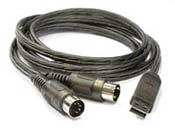
In order to load sounds into any of the DX models via midi your need a “Midi Interface” and two “Midi Cables”. There are two types of midi interfaces. One is a actual piece of hardware consisting of a small box or rack mount device that has midi inputs and outputs. You only need a simple one that has one midi in and out. However, if you have a lot of synths and samplers and plan on recording them using midi, you can purchase a larger midi interface which can have up to sixteen in’s and outs. The second kind of interface is just a simple USB to Midi cable. This should also do the job for simple sysex dumps, but I have not had the opportunity to test this yet so it’s possible you may run into problems with certain midi devices if you go this route.
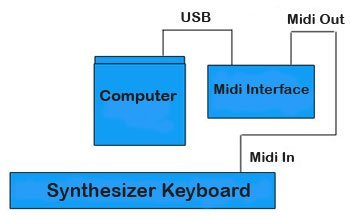
The interface gets connected to your computers USB port. You then run a midi cable from the “Midi out” on your interface to the DX “midi in” port. You can then connect another midi cable from your interface “midi in” to your DX “midi out”. This is called “handshaking” and assures better communication between the DX and your interface. It’s not always necessary to handshake the midi cables, but best to have a second cable around just in case you have to. Some synths will not respond to the dump if the second cable is not connected.
Original DX7 NOTE: You can only load 32 sounds at a time into the original DX7Select Memory SelectSet Memory Protect Internal to “off”The original DX will only receive on midi channel 1 – so make sure your software is set to transmit on channel 1When the display reads “Sys Info Avail”, the DX is ready to receive the data.
Grey Matter E Card
If you have the Grey Matter E board installed there are several additional steps: Press “function”, then “operator select” twice to select the “memory” page, push button 31 twice (Memory Protect Internal) and then “off”. This disables the memory protect. Then press “function”, then “operator select” four times to select the “keyboard control” page, push button 2 (Midi in filters: SYSEX) and then “on”. This enables SYSEX data transfer.
DX7-2 Series
In the DX7-2 synths, most of the midi functions and parameters are adjusted using buttons 31 and 32. Make sure you set the “Rcv Ch” on the DX and your software program set to channel 1. The DX-2 series can hold 64 patches in it’s memory. There are two different memory banks (A and B). The “receive block” (button 31) lets you set which memory bank you load the sounds into. You also need to turn memory protection off (Button #14) and set “MIDI IN” to “normal” (button #29). If you don’t do this step, you get no error message and no hint of what is wrong, but the keyboard will not accept the sysex data.
Well that about covers it. If you need a program to load in the sounds we provide a couple of good ones that are easy to use for both the Mac and PC. More info on how to load the sounds using sysex software programs can be found at our web site.
10 Responses to “Loading Sounds Into The Yamaha DX7 Series Via Midi”
Leave a Reply
You must be logged in to post a comment.
May 6th, 2011 at 2:50 am
Thank you very much for helpful tutorial on loading sounds into all these versions of dx7. I have had great success loading banks onto my dx7 with the grey matter upgrade. I have had much less success in dumping banks from the dx7 to any librarian. If I use midiquest it recieves the first seven patches in the bank, and then all the rest are gibberish, and if I just dump the sysex from the dx7 to midiox, and then send the sysex back to another bank, same thing along with a message on the dx7 to the effect of ‘midi data error’. If you have had success loading banks back to an editor from a grey matter os dx7 mk I any suggestions you could give would be most welcome and appreciated.
-Loren
February 17th, 2013 at 5:29 pm
Great article I have almost got everything on my DX7s working. It produces a readout on midi monitor and works fine with GarageBand but still will not accept Sysex files.
I have turned memory protect off
Set mid receive channel to 1
On transmitting via Sysex librarian it sometime says “receiving transmission” but nothing else is happening.
Any help really appreciated.
Thanks
October 19th, 2013 at 2:54 pm
I am not a great computer user. Please help explain how to get LA standard and other sounds into my DX-7s.I have read this but I need more help
February 21st, 2014 at 9:00 pm
First of all thank you for the detailed post, but do you think you could clarify the buttons for the DX7IID? By function do you mean the “edit” button? I can’t find function anywhere
July 13th, 2014 at 1:21 pm
Hello, I am a friend of Jeff (the above post). I am a little better at computers so I am wondering if handshaking is critical? Also, we needed to upload LA Standard. Any clues? jamie
June 10th, 2015 at 10:24 am
Did not work when I used the usb to midi interface. Any suggestions?
August 6th, 2015 at 4:51 pm
Hello, I’m trying to upload patches from sysex librarian to my dx7ii-fd. I’m a little confused about the steps. I follow you from the step about turning the memory protect off (button #14), but I’m lost about the others. The receive block is on #32 and #29 is performance parameters. Any clarification or explaining what I’m missing would be greatly appreciated.
June 16th, 2017 at 3:52 pm
Fantastic blog! Do you have any tips and hints for aspiring writers? I’m planning to start my own blog soon but I’m a little lost on everything. Would you recommend starting with a free platform like WordPress or go for a paid option? There are so many choices out there that I’m totally overwhelmed .. Any ideas? Thanks!
February 7th, 2023 at 5:19 pm
I have a question about downloading patches to a DX-7 keyboard. When a patch is downloaded, is it only one sound or is it a whole bank of 32 sounds?
Thanks,
Jeff
June 11th, 2023 at 11:19 am
Hi Jeff, The sounds get loaded by bank, 32 at at time.