Korg M3 Tutorial Working With Samples
Midi Tips May 16th, 2008
Demo Package Includes:
1- WAV folder containing eleven WAV files
2- VS_PAD.KSC file and folder containing all the .KMP files set up as a “Multi Sample” program. This must be loaded every time you start up since the M3 does not retain sample data in it’s memory when shutting down.
3- VS_PAD.PCG file contains two programs set up to load into your USER-G Bank.
Program 000 – Prophet VS Pre Edit Data – what the samples sound like before any editing is done.
Program 001 – Prophet VS Pad Complete – the finished program.
This demonstration can be used in two ways. You can either just load in the .KSC and .PCG files and get a taste of how we added new Prophet VS multi samples to our Proto Rock M3 Collection. Or, you can follow the steps below and create your own program from the eleven wav files that we have included. This tutorial will give you a much better idea on how to create new programs using your own samples. It is not meant to be used exactly the same in every situation since there are many different ways to import and set up sample programs, It’s more to be used as a guideline on how to key map samples across the keyboard and get you started with using sample data on the m3.
Each WAV file has been sampled from our vintage Prophet VS synthesizer and includes an assortment of C’s and G’s. The files must be “Key Mapped” into the M3 in order for you to be able to use them in a program or combi. In case your not familiar with how all that works, we’ve created a step by step on how that’s done.
Also included is a .KSC file which has the samples already set up as a program and shows an example of what your finished program should look/sound like. Also note the effects, KARMA scenes and real time controls that were added to the program to put the finishing touches on everything.
HOW TO CREATE A PROGRAM FROM SAMPLE DATA WAV FILES
1- Save the “VS Demo” folder to your USB hard drive or memory stick. Connect your drive/stick to your M3 USB port.
2- Choose the Media button and find the “WAV” folder and choose it and choose “open”. Choose the top file “P00_C2.WAV” and choose “load” then choose “OK”. The data should load. Repeat step 2 with the other ten files until all eleven wav files are loaded.
3- Choose the Sampling button and highlight at the very top of the page where it says “000: NewMS” and choose the next available Multisample slot. The “create new multisample” box will pop up. Highlight the stereo button if you have a stereo sample and then choose OK.
Highlight the “Sample” function. Choose the top sample “P00_C2.WAV”. That sample should appear in the M3 sample function display.
4- Just under the sample you will see the OrigKey and TopKey parameters. Leave them both at C2 and choose “create”. At that point that one sample should now be “mapped” on C2 (the bottom note on a 61 note M3. If you have an extended keyboard with 73 or 88 keys then the sample should also be any note under C2. Play C2 on your keyboard and the you should hear the sample.
If you can hear the sample when you play C2 then move on. If not then recheck your steps. You probably overlooked something.
5- Choose the sample arrow option again and now choose the P00_G2.WAV sample this time. Set OrigKey to G2 and TopKey to A#2. This will map out the second sample between C#2 and A#2 and fill out most of the next octave. Play any of the keys in that range to test.
If you have gotten this far and everything is OK then you probably have a good idea how to finish key mapping the rest. Basically you now have to repeat step five several times where you set the range of the sample with the OrigKey and TopKey functions. The OrigKey is always the same as the original sample name (C3, G3 and so on) and you always “stretch” the TopKey usually three or four notes above the original. Usually a E or A# in this example. Remember that the goal is to fill in all the notes on the keyboard.
Also remember to create your multi samples in the following order:
1- C2 – index slot 1 2- G2 – index slot 2 3- C3 – index slot 3 4- G3 – index slot 4 5- C4 – index slot 5 6- G4 – index slot 6 7- C5 – index slot 7 8- G5 – index slot 8 9- C6 – index slot 9 10- G6 – index slot 10 11- C7 -index slot 11
6- Play the keyboard to see if all the notes are filled in and that everything is correctly tuned.
Your getting there, but you may be thinking that this VS Pad thing sure does not sound like much. Yeah, that’s exactly right! To get the sound just right we have to turn this into a M3 program.
7- Choose the top right arrow to get to all the sampling options and choose “Convert MS to Program”. Select the program slot where you would like to store the program and choose OK. Then save your program to the M3’s memory by going to “write program”.
8- Select program mode and find your program. Now you can start editing it the same way that you edit any factory program.
The first couple of things I would do is name the program and then save everything. Then you can get on to creating that cool pad sound. You now have to create two separate files;
A- A PCG file which will save your program
B- A KSC file which saves the multi sample data.
You don’t actually “have” to create a PCG file right now since this program will stay in your M3 memory until you load over it with something else, but it’s always a good idea to back up your data. However, you do have to save your sample data as a .KSC file since the m3 does not hold the data in it’s internal memory and must be loaded in each time you boot up the machine.
To create and save a .KSC file:
Choose Media – Select Save
Select “Save Sampling Data”
Name your file. We named ours VS_PAD
Choose OK
All your samples should now save to your USB drive or memory stick and you should now have a file on your drive called: VS_PAD.KSC along with all the samples saved as Korg .KMP files.
Now you don’t have to go through all of that the next time you boot up the machine! Just load the file and your ready to start editing the program.
To create and save a .PCG file:
Choose Media – Select Save – Select “Save PCG”.
In this case your only saving one program bank so uncheck all the program banks except the one bank where your Prophet VS Pad is living. We have chosen the User G bank and have unchecked everything in the program section except the USER G bank. Your not saving any combi, drum kit, drum track, global or radias data so you can uncheck all of the combi and drum kits boxes as well as the drum track, global and radias boxes. Choose OK.
OK great. You have now backed up all your data and won’t have to start all over again if the power goes off at your house!
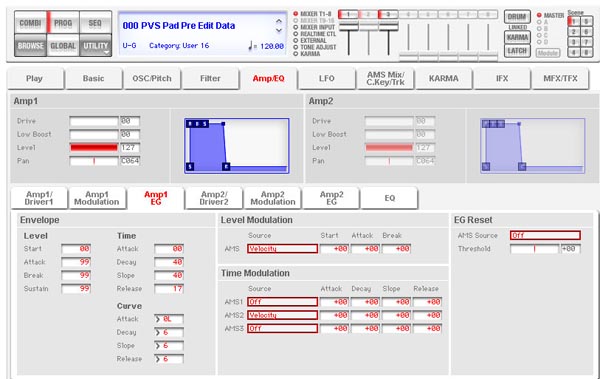
At this point the editing and creation of the final program begins. There is much that needs to be done to create a finished program and since programming is an art, the results will vary from person to person. However, here are a couple of tips to get you going. First notice that your program does not quite sound right. As soon as you lift your hand from the keys, the sound cuts off. Not a very natural sounding patch is it? What you need to do is adjust the “amp envelope” settings.
Go to; AMP/EQ and Choose AMP1 EG. This is where you adjust the settings. Below are two pictures. Example A: shows the envelope settings for a pre-edited program and should have the same settings as the program that you have created. Example B: shows what the correct envelope settings should be. Make the adjustments, play the keyboard and now when you release the key, there is a much more natural decay of the notes played. Your program is now staring to take shape.
Example A:
Example B:

There are many more steps involved in finishing up your new program. Adding effects, real time controls, drum track and KARMA settings just to name a few. For those who are interested we have included a finished Prophet VS Pad program which includes all of the above and more. Just load in the VS_PAD.PCG file into your User G bank and you will see/hear what a complete program should look/sound like. There are two programs included in the file.
Program 000 – Prophet VS Pre Edit Data – what the samples sound like before any editing is done.
Program 001 – Prophet VS Pad Complete – the finished program.
For those interested in learning how to program, look take a good look at the finished program (P001) and you can see how the effects, real time controls and KARMA settings look compared to the “bare bones” (P000) program. That should give you some ideas on how everything works.
Well that’s a mouth full! I hope this gives you a much greater understanding of how to work with new multi samples. Setting up one from scratch can be a bit confusing at times when your first starting out, but like anything else if you keep doing it your bound to get better. If you have any questions or comments please contact us at: support@kidnepro.com and we will be happy to assist.
Happy sampling and good luck!
More Korg M3 Info:
How to convert wav files to drum patterns

May 18th, 2008 at 1:01 am
Hi Kid,
Very informative. Loved the VS pad! Keep up the great programming.
JP
May 19th, 2008 at 5:09 pm
Just updated to Proto Rock 1.4 and I’m very impressed. The new Radias sounds are amazing. Especially the combis. Thanks for all your hard work.
May 19th, 2008 at 9:13 pm
Great tutorial. I’m new at sampling and had no idea how to get started. Your tips got me up and running in an hour. That Prophet VS pad sound is awesome! I can’t believe that I’m actually starting to program thanks to you guys.
May 20th, 2008 at 7:23 am
hello from belgium !
thank you for the informations !
i’m gonna buy a M3-73 soon ! i’m very excited !
Hope I will understand all the secrets of the beast !
This will help me for sure !
Hope my english will be good enough to understand every tricks !
take care
michel
July 23rd, 2008 at 2:19 pm
tnx for this tutorial, good one.
June 4th, 2009 at 7:19 am
Is there a way to load all your samples automatically once the keyboard is turned on just like the way it does with the pcm expansions 1 2 & 3?
June 4th, 2009 at 12:23 pm
Hi jbeliz,
Sorry, but no. Korg created the .KEP extension so their PCM expansions would load automatically. It’s an encrypted format to protect Korg’s samples. I don’t think they would release a tool to make KEP’s, because then someone could reverse engineer the encryption.
June 25th, 2009 at 11:22 pm
great tutorial thanks
Also i would like to load my own wave files into the M3 to play samples from our album but it wont let me load my wave files.
It says unreconisable files but they are wave files
please help
June 26th, 2009 at 1:34 pm
Hi Nuge,
Your WAV files are probably not 16 bit. Convert them with any sample editing software before importing. I’m not sure, but I also think the WAV files must be 44.1k, so try that too if converting to 16 bit does not work.
Good Luck!
January 13th, 2010 at 7:02 am
Hello fellow keyboardists!
I have learned to sample BUT I have a problem loading them properly. I have sampled stuff used for live performance with my band. I have sampled a lead sound, and 2 intros + a padlike sound and Converted the MS to program.
I did the “Save All ” Feauture which saves everything.
Everytime I turn the M3 off it unloads everything and when I load a sample back it places everything in sample mode as well. So that all my Combis, Programs and splits play a dry sample lead sound that I sampled earlier on top of my splits, sounds ++.
How can I load the MS that I`ve created without it interfering with my Splits, combis, Programs But STILL load the multisampes that Converted to programs?
I need help badly, cause we are having a huge concert which needs all of these samples very much!
I am willing to pay someone to help me. haha
Kind Regards,
Me
January 13th, 2010 at 1:17 pm
Hi KeyboardFreak,
If you follow the steps in our tutorial you should not have that problem. Also, no need to “save all”. Just save “sampling data” as a KSC file and then save your PCG file with your program and you should be good to go.
September 8th, 2010 at 2:53 am
Can you recommend an inexpensive (or free) audio editing software that will allow me to convert music files to usable samples? Thank you for the help
March 18th, 2011 at 9:58 pm
Keyboard Freak,
I have the exact same problem. Still haven’t found the solution.
In case other readers don’t what I’m talking about. I have imported samples (wav) I created in sampling mode a MS that I also converted to a Program. Since I’m using lots of sounds, I created a combi with my new program that uses my imported files. I saved my KSC file and my PCG file but everytime I turn off my M3 when I reload my files it doesn’t play.
Then I have to redo all the step mentionned below : HOW TO CREATE A PROGRAM FROM SAMPLE DATA WAV FILES
Anyone with the same problem. If you have an answer please email me at yanikrouleau@gmail.com