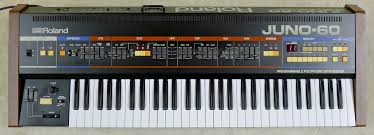
Tape recorder or computer interface connections; Connect cable from your tape recorders or computer audio interface “output” to the rear “input” on the Juno-60 (LOAD).
1- Set the tape or software program so it will be played back from the very beginning of the data (where you hear a pilot tone).
2- Set The Memory Protect switch on the rear panel of the Juno-60 to OFF.
3- Set the tape recorder/software to PLAY, then press the LOAD button (8) on the Juno-60. The LOAD indicator will light up and the program number display window becomes blank, showing that the data has started. Be sure to press the LOAD button before the modulation tone is heard.
If the load button goes out and the program number display window shows double dashes (–), the loading is complete.
If error message occurs adjust output level on your tape machine. If the output level is too high or too low you will get an error message. Experiment to find the proper level for your equipment. Also make sure to press the load button at the right moment.
Saving Instructions:
Tape recorder or computer interface connections; Connect cable from your Juno-60 “save output” to the “Line input or Mic Input” on the Tape recorder or computer audio interface.
1- Set your tape recorder or software to record mode.
2- Press the SAVE button (#6) of the Juno 60. The save indicator will light up and the program number shown in the display window will go out. Also. the pilot tone will be sent from the SAVE jack.
3- If you tape recorder features the recording volume adjust knob, adjust it so that the pilot tone registers near 0 db. In 4 or 5 seconds the Juno-60 produces a modulated tone, i.e.saving into the tape recorder/software begins. (be sure to complete adjusting the recording level before the modulated tone is heard.
BTW: In case your not already aware of it, we have a cool collection of sounds for your old Juno-60. 112 Patches are available on data cassette or WAV file download. That will get your old Juno back on it’s feet again. More info can be found At The Roland Section Of Our Web Site
Many of you have just picked up an old synthesizer and it did not come with an owners manuel. Since there seems to be little info available online, we have been getting many requests for more info on how to load and save sounds into vintage synthesizers via the data cassette port. We’ve started things off with how to load & save sounds into the Roland Jupiter-6.
Tape recorder or computer interface connections; Connect cable from your tape recorders or computer audio interface “output” to the rear “input” on the Jupiter-6 (LOAD).
To load in new sounds:
1- Turn off the “memory protect” switch in the rear of the Jupiter-6.
2- Adjust the output level on your cassette player/software. The best loading levels are at “0” DB. Once the adjustment has been made, begin the tape/wav playback with the pilot tone and press the Jupiter-6 “load” switch.
3- The data will begin to load into your Jupiter-6. Each Bank light should flash one at a time as the data is loading in. If one or more begins to blink then an error has occured. In this case adjust your output levels and try again.
Jupiter-6 If none of the banks blink then all has loading in OK.
Tape recorder or computer interface connections; Connect cable from your Jupiter-6 “save output” to the “Line input or Mic Input” on the Tape recorder or computer audio interface.
To save your old sounds:
1- Press the Jupiter Dump or Save button. The Jupiter will send a pilot tone to your tape recorder/software. Adjust your recording levels on your tape recorder so that the tone reads at about “0 db”.
2- Begin recording with your tape recorder/software, beginning with a clear portion of the pilot tone. The Jupiter will soon produce a modulated tone and begin to save the banks one at a time.
3- When the Jupiter has dumped it’s entire memory, the pilot tone will appear again. Record a few seconds of the pilot tone.
We have found that the best tape recorders to use for this kind of data transfer are those small portable ones that you can get at radio shack for about $50. The ones that are usually used for recording voice lectures and that kind of stuff. The key feature is that the tape recorder must have an “adjustable output” so you can control how much signal the synthesizer will receive. That’s critical when transferring data this ancient way. Most of the old analog synths from the 80’s that use the cassette interface need to have everything just right or else you will get the dreaded “error” message.
Of course, if your using a computer to transfer the WAV file, that will make your life a bit easier. However, you still have to make sure that your output level is right to avoid getting errors. Simply adjust the output level of the wav file to suit your equipment.
Another important thing you should know is that cool old analog synthesizer that you just got may not make any sound at all! There is a good chance that your synths “internal battery” has died and you need to replace it before loading in any new sounds. For more info CLICK HERE
BTW: In case your not already aware of it, we have a cool collection of sounds for your old Juno-60. 112 Patches are available on data cassette or WAV file download. That will get your old Juno back on it’s feet again. More info can be found At The Roland Section Of Our Web Site
At several ofour vintage synths web pages, it say’s that our sounds are available in WAV file format. Let me explain what’s up with that. I’ll use the Oberheim OB8 as an example.
In this case, the WAV format is different then what you might expect. You can not load these sounds into your software sampler. When you purchase the .wav format, you need a Oberheim OB in order to use the sounds. If you want OB8 sounds for your software sampler then GO HERE.
So, instead of purchasing the data cassette tape, you get the sounds in a downloadable format. Now you don’t have to wait for the cassette tape to be delivered in the mail. That’s one of the cool things about the internet. You couldn’t do that back in the 80’s!
Once you download, just connect your computer audio output to your synths cassette interface input and you can load in the sounds the same way you would from a cassette tape. The files will open in any program that plays WAV files. You can use your DAW or even iTunes to load the files.
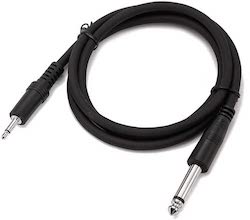
You just need a cable to connect your computer to your synth. It’s a 1/8′ mini plug for the computer and a standard 1/4′ plug for your synth. You can get one at Amazon.
This works the same for any of the 80’s vintage synths which load sounds via the old cassette interface.
Yes, we are just about the only sound company left from those early days of midi and have lot’s of cool sounds for those old 80’s synth beasts. The decade of Miami Vice, Van Halen and Big Hair.
Not sure how to download sounds or want to know how e-mail delivery works? It’s quick, simple, and FREE! And best of all, you can have your new sounds today.
Here’s how it works: After you place your order, we e-mail you a password with a web link. Just click on the link and sign in with your info. Then click on the link and download your new sounds. Easy as pie.
If you’re working with a synthesizer, save the files to a Floppy Disk, Smart Media Card, USB Stick, Hard Drive, CD-ROM or whatever format your synth is using for storage. Then you can load in our sounds from your Synths Floppy Drive, CD-ROM or Smart Media Device. If you’re using a digital sampler then just take the new samples and import them into the software program or hardware sampler that you’re working with.
You can also load in the sounds through your synths Midi port by doing a System Exclusive (.syx) data transfer. We include a cool app with your order that lets you load the sounds via Midi.
We also have the synth sounds in standard midi file format (.mid). You can use your sequencer program (Logic, Cubase, Digital Performer etc) to load in the data.
So, there are several ways to load sounds into your synth. Just let us know which synth or sampler you’re working with in the “comments” section of our order form and we will take care of the rest.
Most sounds are available for download delivery. For more info on how to load sounds via midi, check out our “Sysex Made Simple” page.
If you have any questions or problems with the e-mail delivery we will be happy to assist. Our customer support rules!
That’s right. We get a lot of calls and e-mail from synth owners in a panic because they just turned on their keyboard or module and all the sounds are gone. They want to replace them as soon as possible for that gig on the weekend or tonight’s recording session.
Many of them ask…..”What Happened”???
What happened was that their synth’s “Internal Battery” died. That’s right… All hardware synths come with a battery that is inside the casing. Most have “Lithium Battery’s” similar to a cell phone or digital camera. Those little round ones that are about the size of a U.S. nickle. They are designed to last about ten years and when they die whatever you have in your synth’s memory is wiped out.
It’s great if you have your data backed up. Of course if you don’t then your in trouble, so make sure you back up your sounds. However, even if you do have your data backed up you will have to replace the battery or else the synth will not hold the data in it’s memory. As soon as you turn off the synth everything gets wiped out again.
What you have to do is open up the synth and take the casing off so you can get inside and replace the battery. That can usually be done pretty easily with just a philips screw driver. Some synths are easier to get inside then other ‘s so if your not quite sure about how that works then best to call a service tech who can go in and do it for you. In general it’s a fairly simple job that you can probably handle without having to pay a tech to do it for you.
Once you have the synth’s casing off then look around for that little nickle shaped lithium battery that I talked about. Simple remove it and then look for the model number that should be on the face of the battery. If the model number is not on the battery then contact the company who manufactures the synth (if they are still in business) and ask them what it is. You can also try doing a search on google or any internet search engine. You never know what your gonna find on that!
The good news it that it’s usually pretty easy to get a replacement battery for most synths. Places like Radio Shack, J&R music or many computer stores carry a wide selection of lithium battery’s. They only cost a few dollars so you can be back up and running without having to go too deep into your pockets.
Once you’ve replaced your battery and put the casing back on then just load everything back in and you will be back in business. Many newer synths can be “re-initilized” from the synths front panel which will get you back to the factory settings. Check your owners manuel to see if your synth can do that.
If for one reason or another you have not backed up your stuff then contact us and we will try to help you out. We have a large inventory of patch data from many vintage synths going back nearly twenty five years and there is a good chance that we have a great collection of sounds that you can use to get you going again. It may not be the same data that you originally had, but it will certainly get you back on track and there is a good chance that you will find a big improvement over to what you had in there originally. After all it’s from “The Patch King”!!!!
The morel of the story is “BACK UP YOUR DATA”. You never know when your synth’s battery is going to die and best to be prepared. There are several ways to back up your stuff depending on your synth. Vintage synths produced during the 70’s and early 80’s usually did it to a data cassette tape although with the advent of MIDI in the mid 80’s that all changed and the newer synths let you use “sysex – system exclusive”. That store’s the sounds on your computer hard drive. More info on how to save and load sounds via midi can be found at another article we have put together called SYSEX MADE SIMPLE. Be sure to check that out if your interested in saving your sounds on your synths hard drive.
If you need any more info please contact us and we will be happy to help you out.
We get a lot of questions about how to “Key-Map” our AIFF and WAV files so we thought we would fill you in at the “Midi Tips” section.
Two of the most popular formats in which most sound companies (including us) save their digital samples is the “AIFF and WAV” formats. AIFF (.aif, .aiff) stands for “Audio Interchange File Format” and was developed by Apple for storage of sounds on the Mac. Windows WAVE: (.wav) format was created by Microsoft and IBM, and it has become a popular standard in saving sounds on the PC. WAV sounds will also work on the Mac, but AIFF will not work with windows PC’s.
Almost all of todays music digital hardware and software samplers can read AIFF and WAV files, but before you can actually make music with them you need to know a few simple things.
AIFF and WAV files are individual samples that must first be set up as “programs” before you can create songs with them. In other words, each AIFF or WAV sample is a different musical note. The samples must be “key mapped” across the keyboard so you will be able to play all 12 notes in a typical octave or all 88 notes over the entire keyboard. Each sampler does this a little differently so we won’t get into the exact steps on how it’s done, but here are a few general tips that should help get you started.
For most instruments we usually sample in “Root” and “5th” of the scale and give you several C’s and G’s to work with. We then sample the same notes across several differnt octaves (C1,G1,C2,G2 and so on). We usually sample five octaves which then fill’s in a typical 61 note keyboard. In most cases that is all that’s needed. If we sampled every single note then the file sizes would be so large that they would not be able to fit in many samplers. Even with todays software samplers which have tons of sampling RAM, it would be a great waste of space and take longer to download if we sampled ever single note. Instruments like an acoustic piano require you sample more notes, but in most cases just sampling the Root and 5th’s are enough to create a realistic sound for instruments such as basses, leads, pads and strings.
Key Mapping also allows you to set up your own custom drum kits where you can (let’s say) put your Kick drum on C, snare on D, hi hat on E and crash cymbal on F. You could also put that kick drum on the C and stretch out the sample using key mapping to have it play across a complete octave (12 notes) by itself. Each note then becomes a different pitched kick drum and if you do that and play two or three notes at the same time you get a super phat kick! You can also key-map two or three different kick drums on that one C to create a fatter kick drum. It all depends on how you want to set up your drum sounds.
To key-map the C and G sounds into your sampler follow these steps:
1. Take the C’s and the G’s and match them to the notes on your keyboard. Start with C1 and map out all the C’s across the range of the keyboard.
You may have to tune the notes up one octave depending if your using a 88 note or a 61 note keyboard.
2. With all the C’s keymap (stretch) the low note down to Bb and the high note up to E. Each sampler does this a bit differently so check your owners manuel on how this is done on yours.
3. With all the G’s keymap the low note down to F and the high note up to A.
That will fill in all the notes over your keyboard and enable you to play songs. If you had a “E” in the mix then you would not have to stretch the C’s and G’s as far. The more notes provided, the less stretching you need to do to fill in the whole keyboard.
In general AIFF and WAV files need to be tweaked in order to get the right sound. The files are just the starting point and it’s really up to you do get the programming together to make a “patch”. Adjustments in the envelopes “release section” and filters “cutoff switch” are sure to pop up in most files (just to name a couple). You should also add effects and modulation to complement the sound of the wavs.
AIFF and WAV files take a bit of programming in order to get the sound the way you want it. We give you a great starting point in being able to create a great “patch” and with a little practice your can do the rest. If you need any additional tips to help you along please contact us and we will be glad to assist.
Now that you know all about key-mapping check out our “downloadable AIFF and WAV files”
Midi TipsComments Off on Midi Tips Up And Running with “Sysex Made Simple”
I’ve posted our first article in the Midi Tips category titled “Sysex Made Simple”. Sysex is short for “system exclusive”. A term well known by some and a mysterious hi tech lingo to others.
We wanted to use the blog as a way to answer our most frequently asked questions in detail so I’ve started things off with probably the most popular question….“What Is Sysex and why should I care about it”?


Recent Comments