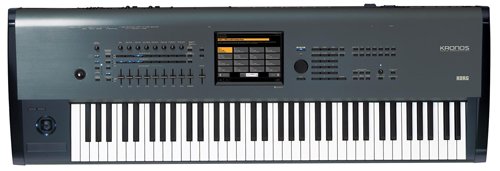
Korg Kronos V3 Hit Factory

New Kid Nepro Releases No Comments »

Kronos Hit Factory – 6 Drum Kits, 64 programs, 32 Combis & 100 MB of new multi samples. ONLY $75. USD.

Korg Kronos Volume #3 – Hit Factory – Our third collection of sounds for the Kronos HD-1 Sound Engine is now available! An amazing mix of fully KARMA-fied Programs & Combis perfect for producers and keyboard players creating hip hop, R&B, techno, rave, trance, rock, industrial or dance tracks.

Hit Factory includes SIX AMAZING NEW DRUM KITS with hundreds of new samples that are guaranteed to get your head noddin with some of the coolest beats found anywhere. The new drum kits contain the best of our classic drum samples from the Patch King sample city vault. Also included are a wide mix of funk guitars, orchestra and horn hits, noises, scratches, human beat boxes, analog vocoders and new voice samples. All programs and combis include full KARMA functions and drum track as well as control assignments to the Kronos Joystick, Vector Stick, SW1 & SW2 and User Knobs 4-8.

Korg Kronos SOUND BUNDLE PACK: Get all three of our incredible Kronos sound sets for only $200. An amazing collection of sounds now available for the Korg Kronos – weighing in at: 192 Programs, 96 Combis, 6 Drum Kits and over 400 MB of New Samples! Get the complete package of Vintage Synths, Soundtrack Mix and Hit Factory for the special low price of $200. USD – A $25. savings.

Click Here For More Info & Demos

Korg Kronos & KARMA – Using Atonal GE’s

New Kid Nepro Releases 1 Comment »

One of the best features in Korg’s workstations over the past few years, has been the addition of KARMA. A lot has been written about it, with many people saying that it’s “difficult to learn” and “you need a PHD to understand how to use it”. Well, it may take some time to understand exactly what is going on when you press that KARMA button, but the musical benefits are well worth taking the time to do that. After all, you did not learn how to play keyboards overnight (right?) and this is very much the same thing. KARMA is like unraveling the DNA of music and can go very deep when it comes to programming sound. If you like to tweak, then KARMA is definitely for you!

KARMA can bring you in directions that you normally would not go and bring new life to your music in ways would never have thought of – so I would recommend anyone who has a Korg keyboard with KARMA included to dig in and see what’s going on under the hood. There is also a lot of great tutorials on how KARMA works at the KARMA LAB WIKI to help you along.

While this is not a tutorial on how KARMA works, I wanted to mention that the music in the video was all done using the KARMA “Atonal GE’s”. A “GE” is a KARMA Generated Effect. It is the name for a single KARMA algorithmic effect. Other keyboards might refer to this as an arpeggio, pattern or phrase, but there is much more to KARMA then what you would find in the simple ARP or pattern. With KARMA, the sky’s the limit!

For those not familiar with the term “Atonal Music” or “12 Tone Technique, Wikipedia defines it as: Music that lacks a tonal center, or key. Atonality in this sense usually describes compositions written from about 1908 to the present day where a hierarchy of pitches focusing on a single, central tone is not used, and the notes of the chromatic scale function independently of one another. More narrowly, the term describes music that does not conform to the system of tonal hierarchies that characterized classical European music between the seventeenth and nineteenth centuries.

In other words, it’s not your typical pop music that’s in the “Key of C” – so don’t expect to write your next billboard top 100 hit using the KARMA Atonal GE’s!

The inventor or twelve tone technique was the Austrian composer Arnold Schoenberg, who first described it in 1923. The method was used during the next twenty years almost exclusively by the composers of the Second Viennese School – Alban Berg, Anton Webern and Schoenberg himself.

Atonal technique works best if your composing modern classical music or doing movie soundtracks – so if your doing that or interested in getting into it then check out our upcoming release for the Kronos titled “Soundtrack Mix”. It’s going to be much like the Soundtrack Mix for the Korg M3 which features many of the best sounds from that collection – including many of the programs and combis that use the KARMA atonal GE’s including the mind blowing “Mind Of Cheney” combi.

The demo contains a combi that we call “Schoenberg Orchestra”. It has five parts included – the four KARMA GE’s and a drum track.

Part 1 – Acoustic Piano
Part 2 – String Section
Part 3 – Orchestra Hits
Part 4 – Percussion
Drum Track – Timpani

The first three parts all use the same “Atonal 1” GE, while the other two parts are the rhythm that holds everything together. KARMA has eight different “scenes”, where you can set up different instruments and rhythms on each one. It makes it easy to create an complete arrangement in a combi just from switching from one scene to the next. As you can see in the video, you don’t need to play a lot of notes to create a cool effect. Just hit one or two and let the GE’s do the rest!

Soundtrack Mix for the Kronos will include 64 New Programs and 32 New Combis and will be available February 2012. More info on all our Korg Kronos sounds can be found HERE.

Korg Kronos Tutorial – How To Move Sound Banks

Midi Tips 2 Comments »

How To Move PCG Data From One Sound Bank To Another

EX: Move your “User-E” bank to your “User-G” bank

Now that the version 1.5 OS for Kronos has been released and we have all those extra banks of sounds, you may want to start moving stuff around. Here’s how…..

NOTE: Best to back up any edits to the factory sounds or any new programs or combis you have done to a PCG file before attempting anything. There is no need to save “all” the data when saving a PCG file. Just save the bank that you have been editing. Then if you have to load in that PCG again, it won’t affect any of the other banks.

Go to: DISK/SAVE/Name your PCG and Save your USER-E soundbank as a PCG file to your USB hard drive or memory stick. Make sure to save just the Programs and Combis from the User-E bank. Uncheck all the other banks as well as the Drum Kits, Wave Sequences, Global Settings & Set List.

Go to: DISK/LOAD/Choose your file – Select OPEN

Choose Programs – Select OPEN

Choose Your Program File – Select LOAD

Pick the new location bank (In our case User-G) where you want to store your file – Hit LOAD.

If your just moving programs around and your PCG does not include any combis or custom drum patterns, then your done. However, if your sound bank also contains combis then repeat the above loading procedure with your “combis” USER-E soundbank.

At this point all your sounds will be moved to the new soundbank (User-G). However, the combis are still referencing the programs in your old soundbank – so you need to fix that.

Go to “Global/Basic” and choose the “Change All Bank References” command.
Highlight the “combination” box
Change UE > UE to UE > UG – Leave everything else the same – Choose OK

When you move combis from one bank to another they are still referencing the programs in the old bank. So if you change around the programs in the old bank by doing something like loading in a new group of sounds, then the combis in the new bank will not work as programmed. The change all bank references command fixes this by changing the combis so they now reference the programs in the new bank.

If you do not have any custom drum patterns that you have created then your done. However, if you do have have any custom drum patterns you also need to change them to point to the new soundbank. You do this in “program mode”. Go to the drum track and change the drum pattern from the old bank to the new one.  In this case for our example, change from USER-E to USER-G. Unfortunately, there is no quick way to change all the programs at once. You must go in and change each program one at a time.

If you happen to mess up anything and want to start over again, you can always reload the factory PCG by going to Disk/Factory where you will find the Preload PCG along with all the other Preload files.

That’s it! The first one or two can be a little tricky, but like anything else it gets easier after you’ve done it a few times. If you have any problems and you need some help just let us know and we will be happy to help.

Note that if your a PC user, I’ve just discovered a cool free app called PCG tools which will do all this for you automatically! You can find more info over at KORG FORUMS.


New Sounds For Korg Kronos – V1 Vintage Synths

New Kid Nepro Releases No Comments »

Korg Kronos Volume #1 – Vintage Synths – Our first collection of sounds for the Kronos HD-1 Sound Engine is now available! An amazing assortment of fully KARMA-fied Programs & Combis perfect for producers and keyboard players looking for some great classic synth sounds to add to their new Korg Kronos.

The Patch King has now tapped into his collection of vintage synths and has sampled a wide mix of sounds from six classic analog synthesizers. Cool new sounds from the ARP2600, Mini Moog & Moog Modular, Roland Super Jupiter/ MKS80, Sequential Prophet VS Rack & Prophet 5 and tape sounds from the Mellotron. Also included in the collection are several new multi samples from our MOSS sound libraries.

Kronos Vintage Synths contains 64 programs, 32 Combis and over 250 MB of new multi samples with a wide assortment of analog basses, leads, pads, strings and killer synth sounds that have that vintage analog sound that many musicians pay big bucks for. NOW ONLY $60. USD.

Click Here For More Info & Demos


Korg Kronos Tutorial Working With Samples

Midi Tips 3 Comments »

Click Here To Download our Korg Kronos Demo Sound Set

How To Load The Demo:

1- Save the Kronos Sample Demo to your USB drive and then Insert your USB drive into one of the USB slots in the back of Kronos
2- Choose “Disk” and select your USB drive
3- Find the Kronos Sample Demo Folder and choose “Open”
4- Choose the “V1DEMO.KSC File” and choose “Load”
5- Highlight Box “Load V1DEMO.PCG too”. Set PCG Contents to “All”. You can also load the KSC and PCG file separately if you like.
6- Select KSC Allocation: Clear RAM – Load Method KSC Setting
7- Choose “OK”
8- Data will load into your RAM Memory & USER-G Bank. Do not touch anything while data is loading.

Demo Package Includes:

1- WAV folder containing twenty Prophet VS WAV files.

2- V1DEMO.KSC file and folder containing all the .KMP files set up as a “Multi Sample” program. This must be loaded every time you start up since the Kronos does not retain sample data in it’s memory when shutting down.

3- V1DEMO.PCG file contains two programs set up to load into your USER-G Bank.

Program 000 – Prophet VS Crystal Pad. Program 001 – Prophet VS Super Pad.

NOTE: When loading the .KSC file, choose the “CLEAR RAM” option.

This demonstration can be used in two ways. You can either just load in the .KSC and .PCG files and get a taste of how we added new Prophet VS multi samples to our upcoming Kronos Vintage Synth Collection. Or, you can follow the steps below and create your own programs from the wav files that we have included. This tutorial will give you a much better idea on how to create new programs using your own samples. It is not meant to be used exactly the same in every situation since there are many different ways to import and set up sample programs, It’s more to be used as a guideline on how to key map samples across the keyboard and get you started with using sample data on the Knonos.

Each WAV file has been sampled from our vintage Prophet VS synthesizer and includes an assortment of C’s and G’s. The files must be “Key Mapped” into the Knonos in order for you to be able to use them in a program or combi. In case your not familiar with how all that works, we’ve created a step by step on how that’s done. Also included is a .KSC file which has the samples already set up as a program and shows an example of what your finished program should look/sound like. Also note the effects, SW1 & SW2, joystick, drum track, KARMA scenes and real time controls that were added to the program to put the finishing touches on everything.

HOW TO CREATE A PROGRAM FROM SAMPLE DATA WAV FILES

1- Save the “Kronos Sample Demo” folder to your USB hard drive or memory stick. Connect your drive/stick to the Knonos USB port. Clear your sample RAM memory before doing anything else!

2- Choose the Disk button and find the “WAVS” folder, find the Crystal Pad folder and choose “open”. Choose the “Multiple Select” button, then choose all the WAV files that are marked with the 16 next to the name and choose “load”, then choose “OK”. The data should load. NOTE: Files with the _ (underscore) next to the name will not load, so don’t choose any of them.

3- Choose the Sampling button and highlight at the very top of the page where it says “000: NewMS” and choose the next available Multisample slot. The “create new multisample” box will pop up. Highlight the stereo button if you have a stereo sample and then choose OK. If your sample is mono then do not check the stereo box. Note that you can “rename” the multi sample by going to the “recording” function on the top/right and choosing “rename ms”. Highlight the “Sample” function. Choose the top sample “PVSPAD1_C2.WAV”. That sample should appear in the Knonos sample function display.

4- Just under the sample you will see the OrigKey and TopKey parameters. Leave them both at  C2 and choose “create”. At that point that one sample should now be “mapped” on C2 (the bottom note on a 61 note Knonos. If you have an extended keyboard with 73 or 88 keys then the sample should also be any note under C2. Play C2 on your keyboard and the you should hear the sample. If you can hear the sample when you play C2 then move on. If not then recheck your steps. You probably overlooked something.

5- Choose the sample arrow option again and now choose the PVSPAD1_G2.WAV sample this time. Set OrigKey to G2 and TopKey to A#2 and choose “create” again. This will map out the second sample between C#2 and A#2 and fill out most of the next octave. Play any of the keys in that range to test.

If you have gotten this far and everything is OK then you probably have a good idea how to finish key mapping the rest. Basically you now have to repeat step five several times where you set the range of the sample with the OrigKey and TopKey functions. The OrigKey is always the same as the original sample name (C3, G3 and so on) and you always “stretch” the TopKey usually three or four notes above the original. Usually a E or A# in this example. Remember that the goal is to fill in all the notes on the keyboard.

Also remember to create your multi samples in the following order:

1- C2 – index slot 1      2- G2 – index slot 2      3- C3 – index slot 3      4- G3 – index slot 4      5- C4 – index slot 5      6- G4 – index slot 6   7- C5 – index slot 7     8- G5 – index slot 8      9- C6 – index slot 9     10- G6 – index slot 10      11- C7 -index slot 11

6- Play the keyboard to see if all the notes are filled in and that everything is correctly tuned. Your getting there, but you may be thinking that this VS Pad thing sure does not sound like much. Yeah, that’s exactly right! To get the sound just right we have to turn this into a Knonos program.

7- Choose the top/right arrow to get to all the sampling options and choose “Convert MS to Program”. Select the program slot where you would like to store the program and choose OK. Then save your program to the Knonos memory by going to “write program”.

8- Select program mode and find your program. Now you can start editing it the same way that you edit any factory program. The first couple of things I would do is name the program and then save everything. Then you can get on to creating that cool pad sound. You now have to create two separate files. 1- A PCG file which will save your program 2- A KSC file which saves the multi sample data.

You don’t actually “have” to create a PCG file right now since this program will stay in your Kronos memory until you load over it with something else, but it’s always a good idea to back up your data.  However, you do have to save your sample data as a .KSC file since the Knonos does not hold the data in it’s internal memory and must be loaded in each time you boot up the machine.

To create and save a .KSC file:

Choose Disk – Select Save

Select “Save Sampling Data”

Name your file. Lets call it DEMOSOUNDS

Choose OK

All your samples should now save to your USB drive or memory stick and you should now have a file on your drive called: DEMOSOUNDS along with all the samples saved as Korg .KMP files.

Now you don’t have to go through all of that the next time you boot up the machine! Just load the file and your ready to start editing the program.

To create and save a .PCG file:

Choose Disk – Select Save – Select “Save PCG”.

In this case your only saving one program bank so uncheck all the program banks except the one bank where your Prophet VS Pad is living. We have chosen the User G bank and have unchecked everything in the program section except the USER G bank. Your not saving any combi, drum kit, drum track, global, set list or wave sequence data so you can uncheck all of the combi and drum kits boxes as well as the  drum track, global, set list and wave sequence boxes. Choose OK.

OK great. You have now backed up all your data and won’t have to start all over again if the power goes off at your house!

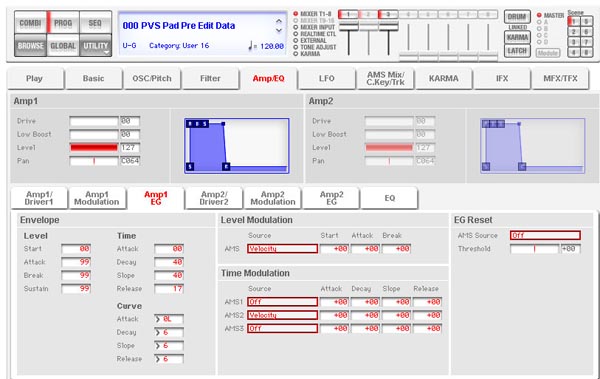
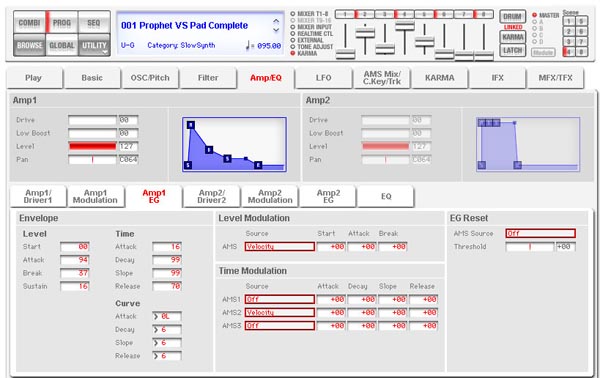
At this point the editing and creation of the final program begins. There is much that needs to be done to create a finished program and since programming is an art, the results will vary from person to person. However, here are a couple of tips to get you going. First notice that your program does not quite sound right. As soon as you lift your hand from the keys, the sound cuts off. Not a very natural sounding patch is it? What you need to do is adjust the “amp envelope” settings.

Go to; AMP/EQ and Choose AMP1 EG. This is where you adjust the settings. Below are two pictures. Example A: shows the envelope settings for a pre-edited program and should have the same settings as the program that you have created. Example B: shows what the correct envelope settings should be. Make the adjustments, play the keyboard and now when you release the key, there is a much more natural decay of the notes played. Your program is now staring to take shape.

NOTE: Since the Kronos Editor is not available yet, the screen shots were taken from the Korg M3 Editor. The layout is slightly different then on the Kronos, but the ADSR settings are the same.

Example A:
Example B:
 

There are many more steps involved in finishing up your new program. Adding effects, real time controls, drum track and KARMA settings just to name a few. For those who are interested we have included two finished Prophet VS Pad programs which includes all of the above and more. Just load in the V1DEMO.PCG file into your User G bank and you will see/hear what a complete program should look/sound like.

For those interested in learning how to program, look take a good look at the finished program and you can see how the effects, SW1 & 2, joystick, ribbon and real time KARMA controls look compared to the “bare bones” program that’s created when you first convert your multi sample to a program. That should give you some ideas on how everything works. You can also go ahead and take things to the next level by importing additional multi samples and setting each to play on different velocity levels. This is useful for creating keyboards, drums as well as many other types of sounds.

Well that’s a mouth full! I hope this gives you a much greater understanding of how to work with new multi samples on your Korg Kronos. Setting up one from scratch can be a bit confusing when your first starting out, but like anything else if you keep doing it your bound to get better. If you have any questions or comments please contact us at: support@kidnepro.com and we will be happy to assist.

Happy sampling and good luck!

More info on our Korg Kronos sounds can be found HERE!


Korg Kronos Released At Winter NAMM

Music Industry News No Comments »

The winter NAMM show has started out with a big bang with Korg announcing their next generation workstation, the Kronos. Looks like us synth programmers will have our work cut out for us with no less then NINE different synth engines combined into one instrument. All that plus the combination of KARMA and One Gig of sampling memory adds up to one very powerful instrument.

Kid Nepro has been working with Korg’s synths since 1985 and has programmed sounds for nearly every Korg workstation since the groundbreaking M1 was released in 1988 – so we just wanted to let everyone know that we will be continuing our support for Korg’s next generation workstation and creating several new sound libraries for Kronos. Stay tuned for announcements later on in the year. Get on our mailing list and we will keep you posted with more details on what’s coming for Kronos. It’s going to be awesome!

More info on Kronos can be found at Korg’s web site.

WP Theme & Icons by N.Design Studio
Entries RSS Comments RSS Log in