Ultimate Reason Refill Bundle Pack

New Kid Nepro Releases 1 Comment »

The Ultimate Refill bundle pack contains “8 Great Refills” combined into one! It includes our complete Drum & Bass, Killer Keyboards, Vintage Synthesizers 1 & 2, SP1200 Library, Electric Guitars, Wave Machine and Midi Mix Collection all in one package. Available as a Digital Download for the super low price of only $100. USD.

Over 3 GB of new samples with thousands of amazing sounds includes the best from our most popular sound collections. Over 100 new drum kits will have you creating killer beats in no time. And, Hundreds of New REX Loops with incredible beats that will jump start your tracks. Killer Keyboards, Unique Analog & Digital Synths and an all around great mix of new samples.

The Patch King Ultimate Refill is an amazing sound library with everything you will need for your next gig or studio session. All set up as Reason programs. No key mapping is needed. Just load and play!

If you already own any of our Reason Refills you can update to the Ultimate Refill for a discount rate. Please contact us for details.

Click Here for More Info & To Order

Korg Kronos Sound Special – Vols 1-15 Bundle Pack

New Kid Nepro Releases No Comments »


SPECIAL Korg Kronos SOUND BUNDLE PACK: Get all 15 of our incredible Kronos sound sets for only $399.

An amazing collection of sounds now available for the Korg Kronos – weighing in at: 832 Programs, 360 Combis, 10 Drum Kits, 32 Wave Sequences, 32 Guitar Loops and over 1.5 GB of New Samples!

Get the complete package of Vintage Synths 1-3, Soundtrack Mix, Hit Factory, Sonix Bliss, Dark Energy, Electric Guitars 1, 2, 3, Wave Machine, Analog Sensation, EXi Super Synths & Electric Pianos & Classic Rock for the special low price of $399. USD – A $329. savings.

More info on all our Korg Kronos sounds can be found at: Our Main Kronos Page

Korg Kronos Tutorial – Creating New Drum Kits Using Custom Samples

Midi Tips 3 Comments »

When programming our Kronos Hit Factory collection, I created six new drum kits using new samples. I quickly found out that there are several steps involved in creating the drum kit and that they all must be done in the right order for everything to work as planned. I figured it would be a good idea to take some notes!

First assemble all your wav samples into one folder. My kits all contain 88 samples and I’ve mapped each sample to one note across the entire 88 note keyboard. The samples that make up the kit usually consist of several kicks, snares, toms, open and closed hi hats, ride and crash cymbals and assorted percussion. Then depending on the style of music your making you can do just about anything. A typical Hip Hop Drum Kit would also have voice samples, orchestra and horn hits, noises, scratches etc.. After everything is prepared your ready to start.

1- Save your folder with the wav samples to your USB hard drive or memory stick. Connect your drive/stick to the Kronos USB port.

2- Choose “disk”, find your USB drive and then your wav folder. Choose your folder and choose “open”. Choose “multiple select”, select all your files and choose “load”. All your files will load in a few seconds.

3- While still in disk mode choose the save tag at the bottom, then choose the save arrow on the top and choose “save sampling data”. You are now about to create a Korg .KSC file – which will save all your samples into one easy to load file. Name your .KSC file, choose “all samples” and then choose OK. Depending on how many samples you have and how fast your drive/stick is, it should take a few minutes for all the samples to be saved to your drive or stick.

Note: There are a couple of different methods of saving your KSC file, depending on which OS your running. To be able to use the best features, including creating your own “User Sample Banks” that will stream from the Kronos SSD, you need to be running version 2.0.2 or later. We recommend that you update to the latest Kronos OS whenever a new OS is available at korg.com. Please check page 154 on your Kronos Operation Guide pdf file that comes with the 2.0.2 download folder for more info on saving KSC files. The 2.0.2 OS will also let you transfer the sounds via ftp in certain set ups. Check your Kronos manuel for more info.


After you have saved the file, remove your drive/stick from the Kronos, connect it to your computer and copy the .KSC file to your computers hard drive. Then you will have a back up in case anything happens to the file on your external drive or stick.

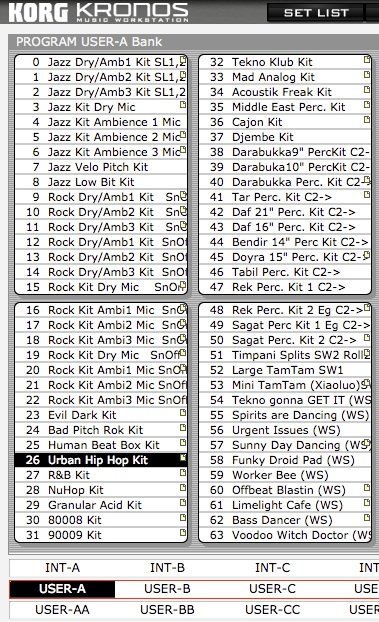
4- Go to Program Mode and pick any of the factory drum kits. You can find them in the INT-F and USER-A banks. Pick the one that comes closest to the style of drum kit that you want to recreate with your new samples. For this example, lets stick with the Hip Hop style and pick Program UA-026 – Urban Hip Hop Kit. Choose the main arrow and choose “write program”, rename it “My Hip Hop Kit” and write the kit to any empty program slot in your Kronos. Essentially you are making a copy of the Urban Hip Hip Kit to work with so you will not change the original program.

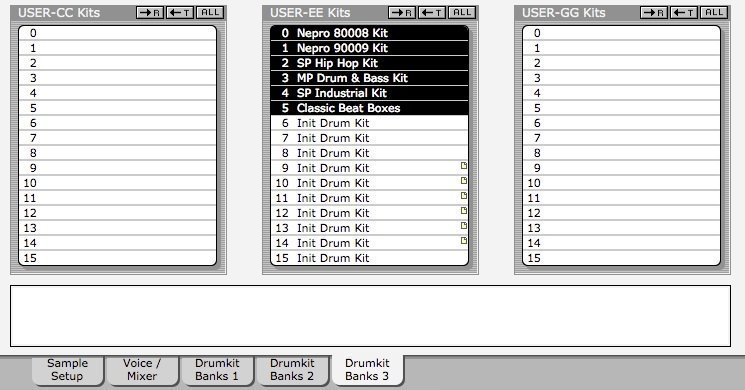
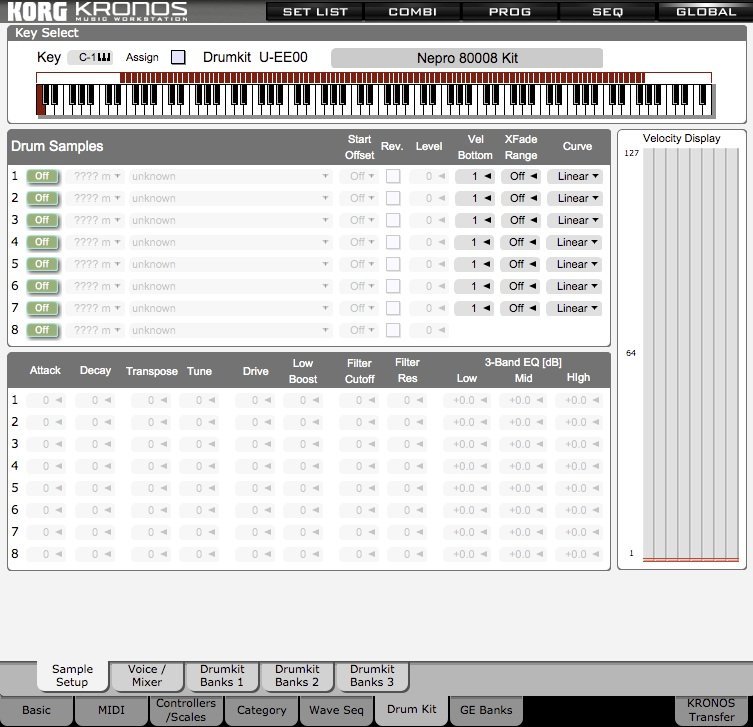
5- Go to the “My Hip Hop Kit” program that you just created in the empty slot and go to “global/drum kit”. On the top/left arrow your should see – Urban Hip Hop Kit. Highlight it.  Under Drum Kit choose the next empty drum slot. It should be C06. Under the “sample setup” arrow choose “write drum kit”, then choose OK.

If you have done everything correctly the Urban Hop Drum Kit will now get written to C06. Go back to your kit and choose “rename”, give your kit a new name (something like “my hip hop kit”), choose the sample setup one more time and choose “write drum kits”, choose OK and your new drum kit has now been added into the Kronos internal memory.

Now your almost ready! But first, go to Program/OSC/Pitch to change the multi sample to your new sounds.

 
I have our Drum Kits stored in the Global User-EE Bank.


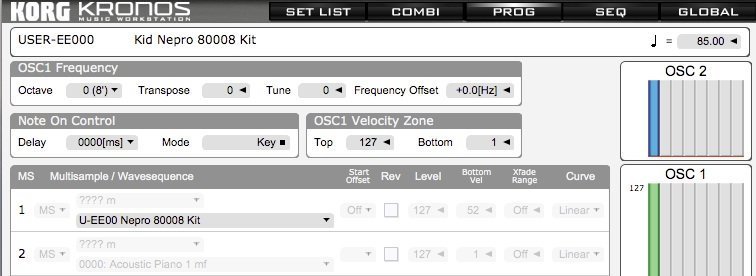
6- Before you start to assemble your kit, you must do one more very important thing. Go back to program mode, find your new “My Hip Hop Kit” program and under OSC/Pitch change the “multisample” from “Urban Hip Hop Kit” to “ My Hip Hop Kit”. Under the main arrow choose “write program” and your all set. If you don’t do this and then begin editing your kit you will be changing the settings on the factory Urban Hip Hop Kit and any program or combi that uses that kit will also change therefore creating a big headache for you!

Fear not. If you happen to change one of the factory kits you can always reload the factory settings.

7- Go back to Global mode – Drum Kit and now your ready to begin assembling your new drum kit. Start with Key A0 if your working on a 88 note keyboard or C2 if your on a 61 note – 5 octave keyboard. You can have up to eight samples on each note. Each with different velocity settings if you wish, Just change the ROM Mono Setting for each sample to RAM Mono if your new samples are in mono or RAM Stereo if they are stereo samples. There are several parameters that you can tweak for each sample to get the sound just the way you want it.

One last thing to note is which samples to put on which keys. This is important since the Kronos internal drum patterns and GE’s use midi note numbers to trigger the samples in each pattern. The easiest way to deal with this is to go through each sample one at a time and simply replace the factory sounds that’s in the Hip Hop Kit to a similar type of sound in your new “My Hip Hop Kit”. In other words, if there is a kick drum on note C1 of the factory kit, then replace the factory kick drum with one of your custom sample kick drums. A snare would replace a snare and so on. Doing this will assure that everything will sound right when triggering your new kit with the factory drum patterns or GE’s.

After you have done some editing don’t forget to again go to the sample set up arrow and choose “write drum kit” to save your new kits changes into memory. Then for safe keeping go back to media mode and save your program and user drum kit as a PCG file. Don’t forget to choose “user drum kits” and the User Bank you have stored the kits into when saving your PCG file.

Remember that while the PCG file stays in memory until you load in something else, you must load in the KSC file each time you power up your Kronos. Just load in the .KSC file that you created with your new samples and you should be ready to start making beats in a couple of minutes. You can also solve this problem by saving your KSC to the Kronos internal hard disk and setting your KSC file to autoload when Kronos starts up. That’s all done in global mode and makes it even easier to start working right away.

If you need any info please contact us at: support@kidnepro.com or just post a reply on our blog.

More info on all our Korg Kronos sounds CLICK TO ENTER OUR WEB SITE.

Korg Kronos & KARMA – Using Atonal GE’s

New Kid Nepro Releases 1 Comment »

One of the best features in Korg’s workstations over the past few years, has been the addition of KARMA. A lot has been written about it, with many people saying that it’s “difficult to learn” and “you need a PHD to understand how to use it”. Well, it may take some time to understand exactly what is going on when you press that KARMA button, but the musical benefits are well worth taking the time to do that. After all, you did not learn how to play keyboards overnight (right?) and this is very much the same thing. KARMA is like unraveling the DNA of music and can go very deep when it comes to programming sound. If you like to tweak, then KARMA is definitely for you!

KARMA can bring you in directions that you normally would not go and bring new life to your music in ways would never have thought of – so I would recommend anyone who has a Korg keyboard with KARMA included to dig in and see what’s going on under the hood. There is also a lot of great tutorials on how KARMA works at the KARMA LAB WIKI to help you along.

While this is not a tutorial on how KARMA works, I wanted to mention that the music in the video was all done using the KARMA “Atonal GE’s”. A “GE” is a KARMA Generated Effect. It is the name for a single KARMA algorithmic effect. Other keyboards might refer to this as an arpeggio, pattern or phrase, but there is much more to KARMA then what you would find in the simple ARP or pattern. With KARMA, the sky’s the limit!

For those not familiar with the term “Atonal Music” or “12 Tone Technique, Wikipedia defines it as: Music that lacks a tonal center, or key. Atonality in this sense usually describes compositions written from about 1908 to the present day where a hierarchy of pitches focusing on a single, central tone is not used, and the notes of the chromatic scale function independently of one another. More narrowly, the term describes music that does not conform to the system of tonal hierarchies that characterized classical European music between the seventeenth and nineteenth centuries.

In other words, it’s not your typical pop music that’s in the “Key of C” – so don’t expect to write your next billboard top 100 hit using the KARMA Atonal GE’s!

The inventor or twelve tone technique was the Austrian composer Arnold Schoenberg, who first described it in 1923. The method was used during the next twenty years almost exclusively by the composers of the Second Viennese School – Alban Berg, Anton Webern and Schoenberg himself.

Atonal technique works best if your composing modern classical music or doing movie soundtracks – so if your doing that or interested in getting into it then check out our upcoming release for the Kronos titled “Soundtrack Mix”. It’s going to be much like the Soundtrack Mix for the Korg M3 which features many of the best sounds from that collection – including many of the programs and combis that use the KARMA atonal GE’s including the mind blowing “Mind Of Cheney” combi.

The demo contains a combi that we call “Schoenberg Orchestra”. It has five parts included – the four KARMA GE’s and a drum track.

Part 1 – Acoustic Piano
Part 2 – String Section
Part 3 – Orchestra Hits
Part 4 – Percussion
Drum Track – Timpani

The first three parts all use the same “Atonal 1” GE, while the other two parts are the rhythm that holds everything together. KARMA has eight different “scenes”, where you can set up different instruments and rhythms on each one. It makes it easy to create an complete arrangement in a combi just from switching from one scene to the next. As you can see in the video, you don’t need to play a lot of notes to create a cool effect. Just hit one or two and let the GE’s do the rest!

Soundtrack Mix for the Kronos will include 64 New Programs and 32 New Combis and will be available February 2012. More info on all our Korg Kronos sounds can be found HERE.

Merry Christmas Charlie Brown – Skating

New Kid Nepro Releases No Comments »

Looks like Vince Guaraldi’s Charlie Brown Christmas music is starting to become a yearly event in the Kid Nepro studio. I had lot’s of fun last year rearranging Greensleeves, so I decided this year to do it again with one of my favorites – Skating. All done on the Korg Kronos.

Merry Christmas & Happy New Year to all my friends, colleagues and customers.

Korg Kronos Tutorial – How To Move Sound Banks

Midi Tips 2 Comments »

How To Move PCG Data From One Sound Bank To Another

EX: Move your “User-E” bank to your “User-G” bank

Now that the version 1.5 OS for Kronos has been released and we have all those extra banks of sounds, you may want to start moving stuff around. Here’s how…..

NOTE: Best to back up any edits to the factory sounds or any new programs or combis you have done to a PCG file before attempting anything. There is no need to save “all” the data when saving a PCG file. Just save the bank that you have been editing. Then if you have to load in that PCG again, it won’t affect any of the other banks.

Go to: DISK/SAVE/Name your PCG and Save your USER-E soundbank as a PCG file to your USB hard drive or memory stick. Make sure to save just the Programs and Combis from the User-E bank. Uncheck all the other banks as well as the Drum Kits, Wave Sequences, Global Settings & Set List.

Go to: DISK/LOAD/Choose your file – Select OPEN

Choose Programs – Select OPEN

Choose Your Program File – Select LOAD

Pick the new location bank (In our case User-G) where you want to store your file – Hit LOAD.

If your just moving programs around and your PCG does not include any combis or custom drum patterns, then your done. However, if your sound bank also contains combis then repeat the above loading procedure with your “combis” USER-E soundbank.

At this point all your sounds will be moved to the new soundbank (User-G). However, the combis are still referencing the programs in your old soundbank – so you need to fix that.

Go to “Global/Basic” and choose the “Change All Bank References” command.
Highlight the “combination” box
Change UE > UE to UE > UG – Leave everything else the same – Choose OK

When you move combis from one bank to another they are still referencing the programs in the old bank. So if you change around the programs in the old bank by doing something like loading in a new group of sounds, then the combis in the new bank will not work as programmed. The change all bank references command fixes this by changing the combis so they now reference the programs in the new bank.

If you do not have any custom drum patterns that you have created then your done. However, if you do have have any custom drum patterns you also need to change them to point to the new soundbank. You do this in “program mode”. Go to the drum track and change the drum pattern from the old bank to the new one.  In this case for our example, change from USER-E to USER-G. Unfortunately, there is no quick way to change all the programs at once. You must go in and change each program one at a time.

If you happen to mess up anything and want to start over again, you can always reload the factory PCG by going to Disk/Factory where you will find the Preload PCG along with all the other Preload files.

That’s it! The first one or two can be a little tricky, but like anything else it gets easier after you’ve done it a few times. If you have any problems and you need some help just let us know and we will be happy to help.

Note that if your a PC user, I’ve just discovered a cool free app called PCG tools which will do all this for you automatically! You can find more info over at KORG FORUMS.


Korg Kronos Tutorial Working With Samples

Midi Tips 3 Comments »

How To Load The Demo:

1- Save the Kronos Sample Demo to your USB drive and then Insert your USB drive into one of the USB slots in the back of Kronos
2- Choose “Disk” and select your USB drive
3- Find the Kronos Sample Demo Folder and choose “Open”
4- Choose the “V1DEMO.KSC File” and choose “Load”
5- Highlight Box “Load V1DEMO.PCG too”. Set PCG Contents to “All”. You can also load the KSC and PCG file separately if you like.
6- Select KSC Allocation: Clear RAM – Load Method KSC Setting
7- Choose “OK”
8- Data will load into your RAM Memory & USER-G Bank. Do not touch anything while data is loading.

Demo Package Includes:

1- WAV folder containing twenty Prophet VS WAV files.

2- V1DEMO.KSC file and folder containing all the .KMP files set up as a “Multi Sample” program. This must be loaded every time you start up since the Kronos does not retain sample data in it’s memory when shutting down.

3- V1DEMO.PCG file contains two programs set up to load into your USER-G Bank.

Program 000 – Prophet VS Crystal Pad. Program 001 – Prophet VS Super Pad.

NOTE: When loading the .KSC file, choose the “CLEAR RAM” option.

This demonstration can be used in two ways. You can either just load in the .KSC and .PCG files and get a taste of how we added new Prophet VS multi samples to our upcoming Kronos Vintage Synth Collection. Or, you can follow the steps below and create your own programs from the wav files that we have included. This tutorial will give you a much better idea on how to create new programs using your own samples. It is not meant to be used exactly the same in every situation since there are many different ways to import and set up sample programs, It’s more to be used as a guideline on how to key map samples across the keyboard and get you started with using sample data on the Knonos.

Each WAV file has been sampled from our vintage Prophet VS synthesizer and includes an assortment of C’s and G’s. The files must be “Key Mapped” into the Knonos in order for you to be able to use them in a program or combi. In case your not familiar with how all that works, we’ve created a step by step on how that’s done. Also included is a .KSC file which has the samples already set up as a program and shows an example of what your finished program should look/sound like. Also note the effects, SW1 & SW2, joystick, drum track, KARMA scenes and real time controls that were added to the program to put the finishing touches on everything.

HOW TO CREATE A PROGRAM FROM SAMPLE DATA WAV FILES

1- Save the “Kronos Sample Demo” folder to your USB hard drive or memory stick. Connect your drive/stick to the Knonos USB port. Clear your sample RAM memory before doing anything else!

2- Choose the Disk button and find the “WAVS” folder, find the Crystal Pad folder and choose “open”. Choose the “Multiple Select” button, then choose all the WAV files that are marked with the 16 next to the name and choose “load”, then choose “OK”. The data should load. NOTE: Files with the _ (underscore) next to the name will not load, so don’t choose any of them.

3- Choose the Sampling button and highlight at the very top of the page where it says “000: NewMS” and choose the next available Multisample slot. The “create new multisample” box will pop up. Highlight the stereo button if you have a stereo sample and then choose OK. If your sample is mono then do not check the stereo box. Note that you can “rename” the multi sample by going to the “recording” function on the top/right and choosing “rename ms”. Highlight the “Sample” function. Choose the top sample “PVSPAD1_C2.WAV”. That sample should appear in the Knonos sample function display.

4- Just under the sample you will see the OrigKey and TopKey parameters. Leave them both at  C2 and choose “create”. At that point that one sample should now be “mapped” on C2 (the bottom note on a 61 note Knonos. If you have an extended keyboard with 73 or 88 keys then the sample should also be any note under C2. Play C2 on your keyboard and the you should hear the sample. If you can hear the sample when you play C2 then move on. If not then recheck your steps. You probably overlooked something.

5- Choose the sample arrow option again and now choose the PVSPAD1_G2.WAV sample this time. Set OrigKey to G2 and TopKey to A#2 and choose “create” again. This will map out the second sample between C#2 and A#2 and fill out most of the next octave. Play any of the keys in that range to test.

If you have gotten this far and everything is OK then you probably have a good idea how to finish key mapping the rest. Basically you now have to repeat step five several times where you set the range of the sample with the OrigKey and TopKey functions. The OrigKey is always the same as the original sample name (C3, G3 and so on) and you always “stretch” the TopKey usually three or four notes above the original. Usually a E or A# in this example. Remember that the goal is to fill in all the notes on the keyboard.

Also remember to create your multi samples in the following order:

1- C2 – index slot 1      2- G2 – index slot 2      3- C3 – index slot 3      4- G3 – index slot 4      5- C4 – index slot 5      6- G4 – index slot 6   7- C5 – index slot 7     8- G5 – index slot 8      9- C6 – index slot 9     10- G6 – index slot 10      11- C7 -index slot 11

6- Play the keyboard to see if all the notes are filled in and that everything is correctly tuned. Your getting there, but you may be thinking that this VS Pad thing sure does not sound like much. Yeah, that’s exactly right! To get the sound just right we have to turn this into a Knonos program.

7- Choose the top/right arrow to get to all the sampling options and choose “Convert MS to Program”. Select the program slot where you would like to store the program and choose OK. Then save your program to the Knonos memory by going to “write program”.

8- Select program mode and find your program. Now you can start editing it the same way that you edit any factory program. The first couple of things I would do is name the program and then save everything. Then you can get on to creating that cool pad sound. You now have to create two separate files. 1- A PCG file which will save your program 2- A KSC file which saves the multi sample data.

You don’t actually “have” to create a PCG file right now since this program will stay in your Kronos memory until you load over it with something else, but it’s always a good idea to back up your data.  However, you do have to save your sample data as a .KSC file since the Knonos does not hold the data in it’s internal memory and must be loaded in each time you boot up the machine.

To create and save a .KSC file:

Choose Disk – Select Save

Select “Save Sampling Data”

Name your file. Lets call it DEMOSOUNDS

Choose OK

All your samples should now save to your USB drive or memory stick and you should now have a file on your drive called: DEMOSOUNDS along with all the samples saved as Korg .KMP files.

Now you don’t have to go through all of that the next time you boot up the machine! Just load the file and your ready to start editing the program.

To create and save a .PCG file:

Choose Disk – Select Save – Select “Save PCG”.

In this case your only saving one program bank so uncheck all the program banks except the one bank where your Prophet VS Pad is living. We have chosen the User G bank and have unchecked everything in the program section except the USER G bank. Your not saving any combi, drum kit, drum track, global, set list or wave sequence data so you can uncheck all of the combi and drum kits boxes as well as the  drum track, global, set list and wave sequence boxes. Choose OK.

OK great. You have now backed up all your data and won’t have to start all over again if the power goes off at your house!

At this point the editing and creation of the final program begins. There is much that needs to be done to create a finished program and since programming is an art, the results will vary from person to person. However, here are a couple of tips to get you going. First notice that your program does not quite sound right. As soon as you lift your hand from the keys, the sound cuts off. Not a very natural sounding patch is it? What you need to do is adjust the “amp envelope” settings.

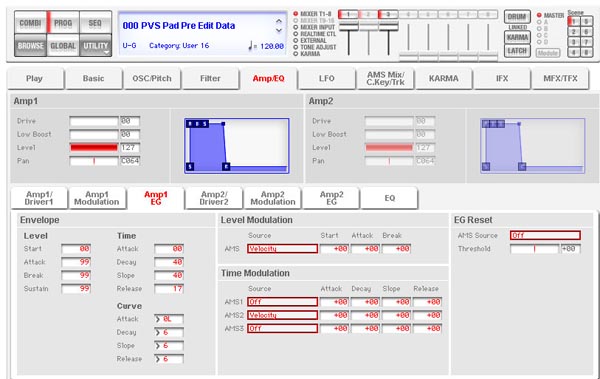
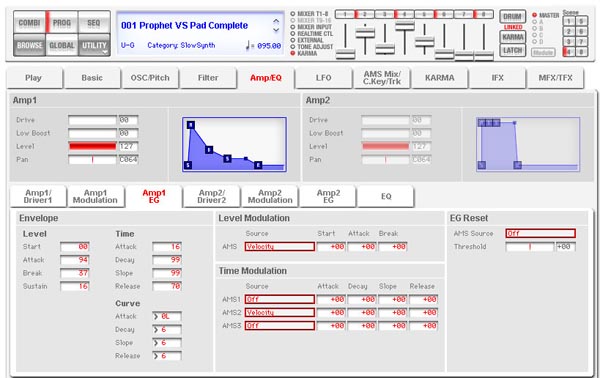
Go to; AMP/EQ and Choose AMP1 EG. This is where you adjust the settings. Below are two pictures. Example A: shows the envelope settings for a pre-edited program and should have the same settings as the program that you have created. Example B: shows what the correct envelope settings should be. Make the adjustments, play the keyboard and now when you release the key, there is a much more natural decay of the notes played. Your program is now staring to take shape.

NOTE: Since the Kronos Editor is not available yet, the screen shots were taken from the Korg M3 Editor. The layout is slightly different then on the Kronos, but the ADSR settings are the same.

Example A:

Example B:


There are many more steps involved in finishing up your new program. Adding effects, real time controls, drum track and KARMA settings just to name a few. For those who are interested we have included two finished Prophet VS Pad programs which includes all of the above and more. Just load in the V1DEMO.PCG file into your User G bank and you will see/hear what a complete program should look/sound like.

For those interested in learning how to program, look take a good look at the finished program and you can see how the effects, SW1 & 2, joystick, ribbon and real time KARMA controls look compared to the “bare bones” program that’s created when you first convert your multi sample to a program. That should give you some ideas on how everything works. You can also go ahead and take things to the next level by importing additional multi samples and setting each to play on different velocity levels. This is useful for creating keyboards, drums as well as many other types of sounds.

Well that’s a mouth full! I hope this gives you a much greater understanding of how to work with new multi samples on your Korg Kronos. Setting up one from scratch can be a bit confusing when your first starting out, but like anything else if you keep doing it your bound to get better. If you have any questions or comments please contact us at: support@kidnepro.com and we will be happy to assist.

Happy sampling and good luck!

More info on our Korg Kronos sounds can be found HERE!


Merry Christmas Charlie Brown

New Kid Nepro Releases No Comments »

Many people might not know the name Vince Guaraldi, but I’m sure they have heard and loved his music since Vince is the one who composed and performed all that great music for the Charlie Brown TV specials back in the 60’s. “A Charlie Brown Christmas” being the one most beloved by millions.

Vince was a great jazz pianist and composer and could swing with the best of them. He even had a hit on the pop charts with his cool “Cast Your Fate Into The Wind”, which (I guess) is how he got the Charlie Brown gig. Hiring a jazz trio play as the background for a cartoon was unheard of at the time and CBS should be credited with trying something new. Turned out it was a match made in heaven. The specials greatest legacy is that they are still being played today, nearly fifty years later. I, like many others look forward to seeing “A Charlie Brown Christmas” on TV this time of year. Just one of those things you never get tired of watching.

If I had to pick a favorite moment in the Christmas special, it would have to be the part where Linus tells Charlie Brown “what Christmas is all about”. The universal theme of “Peace On Earth – Good Will Towards Men” is something that we can relate to – especially in todays troubled times. Many years ago I picked up  The Vince Guarlidi Trio Charlie Brown Christmas CD and always have it on this time of year. It’s some of the best arrangements of classic Christmas music that you will ever hear – so if you have not has the pleasure be sure to pick it up. Great stuff!

As a pianist and composer, I’ve always been influenced by Guaraldi’s work. His music is probably one of the first things that I can remember hearing, having grown up watching those specials on TV way back when. Before I even knew who Guaraldi was, I loved his music – so it was a real treat for me when I finally went out and picked up the sheet music to Guaraldi’s arrangements of “A Charlie Brown Christmas” early this year. I’ve been having a blast playing through all the songs on my old acoustic piano.

After learning most of the arrangements (some of them are pretty hard), I wanted to pick one which I could re-arrange, record and add a bit of my own style to – so I decided to go with “Greensleeves”. I booted up my Korg M3 and Yamaha Motif workstations and went to work recording everything in MOTU’s Digital Performer. Once I had the drum and bass parts recorded everything came together easily. The piano part was a bit tricky since the original arrangement was in “three” (a jazz waltz) and I changed the rhythm to a “slow four” (pop feel), but eventually it came together.

Once I finished recording the music I thought a video would be nice as a Christmas message so I surfed around YouTube and found a bunch of video from the special. I grabbed a few clips and edited everything together on my Mac using Apples Final Cut Express. The project was lot’s of fun from start to finish. I hope you enjoy it as much as I’ve enjoyed putting it together.

Peace On Earth – Good Will Towards Men. We need it more then ever now.

Merry Christmas From Kid Nepro!


The RAM Cards Are Gone – Why You Should Buy A Midi Interface

Midi Tips 5 Comments »

Just about every week, we get several e-mails from someone looking to buy our sounds on the old RAM cards. I usually respond and explain that the cards have not been made in many years and are no longer available. I also mention that all our sounds are available in other formats including system exclusive (sysex) or standard midi files and that all you need to load them into their synth is a “midi interface”.

All of those old RAM cards have a battery inside of them. It’s usually a small “lithium” battery about the size of a US nickel. The battery usually has a lifespan of about five to ten years. After that, they go dead and whatever data you have stored on the card is lost.

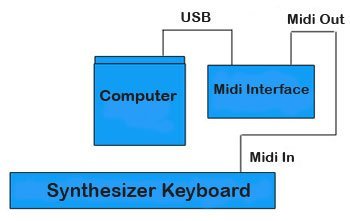
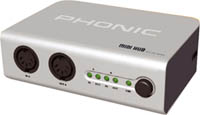
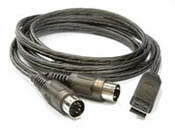
A midi interface is not as complicated as you think. As you can see in the picture, It’s just a little USB device that you connect to your computers USB port. You then run a midi cable from the midi interface “midi output” to your synths “midi input”. Takes about two minutes to set up everything. There are two types of midi interfaces. One is a actual piece of hardware consisting of a small box or rack mount device that has midi inputs and outputs. You only need a simple one that has one midi in and out. However, if you have a lot of synths and samplers and plan on recording them using midi, you can purchase a larger midi interface which can have up to sixteen in’s and outs. The second kind of interface is just a simple USB to Midi cable. This should also do the job for simple sysex dumps, but I have not had the opportunity to test this yet so it’s possible you may run into problems with certain midi devices if you go this route. A USB to mid cable can be purchased for under $20. Midi interfaces are a bit more, but you can find a simple one that will do the job for around $75. USD. That’s about the same amount of money that you would spend on one or two RAM cards!

As I mentioned, we provide you will a software app with your order that lets you load in the sounds from the computer to your synth. The apps are available for both the Mac or PC users. We also provide instructions on how to set up everything to get your computer and your synth talking to each other. This does take a bit more time to sort out everything, but most users have things set up within an half hour or less. The set up is a bit different depending on which synth or computer you have, but most synths are pretty easy to deal with – the older ones only have a few midi parameters so it’s easy to access the midi section and see what’s going on inside.

If you do wind up having a problem once you get our sounds, we don’t forget about you. I’m happy to answer as many e-mails or phone calls as it takes to get you up and running. Our customer support is as good as it gets.

3- Once you have your midi interface up and running you will now be able to do lots of cool stuff with your computer. Not only can you now load our sounds into your synth, but you can also use the software that we give you to “save” whatever sounds you have in your synths memory to your computers hard drive. The midi interface and software app will work with just about any synth that has midi, so you can now do a “bulk dump” to load and save sounds from any synth you happen to have in your rig that has a midi port.

After you get used to using our app to load and save sounds you can then take the next step and get yourself a “librarian” or “editor”. A librarian is a software app which lets you take several banks of sounds and choose the ones you like most to create your own “custom sound banks”. Need a bank of sounds with just organ or piano sounds? No problem. Just use your librarian to drag and drop all your keyboard sounds into one custom sound bank. Some librarians are sold by music software companies, but there are also lot’s of free ones that can you can download online. An “editor” not only lets you set up your own custom sound banks, but you can also access all your synths parameters and “edit” them to create your own sounds. This is what we use when we create the sounds that we offer for sale. Who knows, maybe you can become the next Patch King! Just like librarians, editors can be purchased or found online for free. The ones that are for sale usually have lot’s more features. Some of them, like Mark Of The Unicorns “Unisyn” or Sound Quests “Midi Quest” are both librarians and editors and work with hundreds of different synths and are the top choice among musicians who want to store and edit sounds with their computers.

Unlike the old RAM cards which will just hold a small number of sounds, your midi interface lets you store all your sounds on your computers hard drive – so you can now store an unlimited number of sounds on your drive and access them with a few click of the mouse. You also don’t have to worry that the battery is going to go dead (like on the RAM cards) and you will lose all your sounds. Also remember that your synthesizer has an internal battery with a lifespan about the same amount of time (5-10 years) as the RAM cards. When your synths internal battery goes dead, just like the cards, you lose all the sounds in the synths memory. When this happens, all you have to do is replace the battery and reload the sounds again using our software app and your back in business!

There are many other good reasons for purchasing a midi interface that I won’t go into at the moment. Your welcome to call or e-mail us if you need any more info and I’ll be happy to fill you in.

Kid Nepro Main Catalog

Korg Triton Series Disk Loading Info – How To Move Soundbanks

Midi Tips 3 Comments »
Korg Triton Mix

Directions are for a Triton Classic. There may be minor differences if you own a different Triton model. This tutorial will work with the Triton Classic, Triton Rack, Triton Studio, Triton LE or Triton Extreme. Don’t forget to save your the sounds that are in your Triton before loading in our sounds.

Before attempting to load in any sounds, make sure that the effects are not turned off on your Triton. To check this go to “Global”. There is a section on the lower left side of the screen titled “Effect Global”. There are three parts to it. 1-IFX 1-5 OFF  2-MFX1 OFF  3-MFX2 OFF – Make sure none of them are checked.

All our Korg Triton sounds are set up to load into your “A” bank. If you would like to load the sounds into your A bank, just go to disk mode, choose the PCG file, “choose load” and then “load selected”. Everything will load into your A bank at once. The is the quickest way to load in our sounds.

If you would like to load the sounds into another sound bank, (Banks B, C, D or E) follow these instructions.

PART 1

1-Insert floppy disk into your Triton – Select Disk

2-Select Load

3-Choose the file you want to load and highlight it

4-Select Open

5-Choose Program and highlight it

6-Select Open

7-Select Load/Load selected – in right corner of screen

8-Change from bank A to B, C, D or E – Choose OK – File will load

Repeat  the process and choose “Combis” instead of Programs. You can only load programs into Bank-E.

You do not have to load the Drum Kits & ARP patterns unless you have overwritten the factory Drum Kits or ARP patterns with your own custom kits or patterns.

9- Go to Global/Basic/Change All Bank References

10- Highlight Combination Box

11- Change Program A>A to A>B, C, D, or E Depending on what bank your moving the sounds to

12- Choose OK – Global setting will write to memory

At this point all data should now be moved to the new bank that you have selected. Choose the new bank and play a few of the programs and combos to check and see if everything looks/sounds right.

PART 2

Take note that whatever you have in your “A bank” is now, not going to sound correct in combi mode. That’s because you changed the “Bank References”. What you need to do now is to reload whatever you had in Bank A before you loaded in our sounds and then follow similar steps to change the Bank References back in bank A.

1- Go to Global/Basic/Change All Bank References

2- Highlight Combination Box

3-Change Program  A>B, C, D, or E Depending on what bank you moved our sounds, back to A>A

4- Choose OK – Global setting will write to memory

If you have done everything right then your A Bank should now sound just like it did before you loaded in our sounds and our sounds should now be in one of your other banks.

If you have purchased more then one of our Triton sound collections (we have twelve PCG’s for sale), then you can repeat the process with any of our other PCG collections, each time loading the sounds into a different bank. You can load “up to five” of our PCG’s in the Triton’s memory at the same time. Just keep in mind you can only load programs into Bank E. Combi data can not be loaded into Bank E.

Remember to repeat PART 2 after you have loaded your last set of sounds.

Once you have everything loaded you can then “Save All” in your disk section and then save everything as one PCG file. It takes a little while to set all this up, but well worth it, since you wind up with one file that will load in everything up to five banks at once. You can now create several custom set ups for your live gig or studio session that can load in hundreds of new sounds in just a few seconds.

Click Here For More info and audio demos for all our Triton Sounds

WP Theme & Icons by N.Design Studio
Entries RSS Comments RSS Log in